
Craft Fairs, Street Fairs and Artisan Markets are a huge part of growing a small business as a maker! If you have clear branding, a cohesive product collection and a signature style, you could make a great profit in a few hours, and that's why craft fairs for me are one of my most important streams of income throughout the year.
I have done countless craft fairs in my years as a small business owner, and while no two fairs are created equal, there are a few tips and tricks that you can take with you to any in-person sale to be successful.
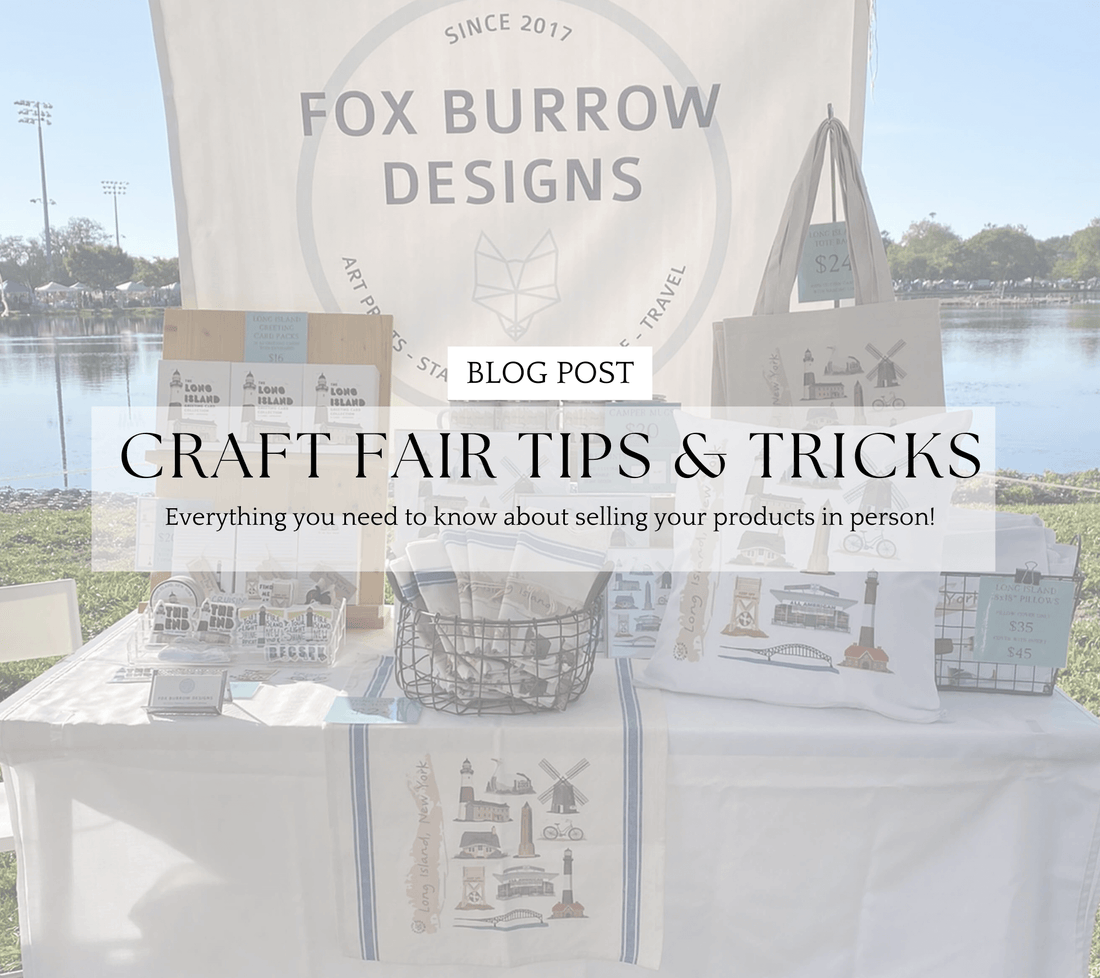
Branding & Signage
- Get yourself noticed! Displaying your logo clearly is the first step in drawing people into your tent or to your booth. Personally, I have a large banner sign that I hang behind my table so it is displayed at eye level for customers. Another option is to have your logo on the front of your table or printed on your tablecloth.
- Put that logo to work! Be sure to include a place on your table for your business cards. Even if a person browses your table, that doesn't guarantee a sale. If you have something for them to take with them to revisit your shop online, or the reach out at a different time, that is just as valuable as a sale sometimes.
- Display all your pricing clearly. Nothing is more annoying than customers constantly asking "how much is this?" Believe me, some will no matter what, but if you can cut down on that by having your pricing clearly displayed, you should. **Pro Tip: Bring all your pricing signs to Staples and have them laminated. This makes them waterproof and reusable if you need to tape them to something on your table.
First Timer's Shopping List
The biggest investment for your markets is going to be buying the initial display items you will need. While not always cheap, these items are sometimes required by your event coordinators and without them, you could be denied a spot! I've created a tried-and-true list of things you need to get your market up and running.
- 10x10" Pop-Up Tent - If you are doing craft fairs or street fairs outside, you will absolutely need your own tent. Standard market spaces are 10x10" which is great because that is a common tent size. Here's a great tent option to get you started!
- Tent Sides - I would highly recommend purchasing tent sides that fit your pop-up tent. These fold down and are easily stored in their cases, but they are great if it unexpectedly starts to rain, or if you want to separate your product visually from the tent next to you. A tent side at the back is also a great neutral backdrop for your sign. Here are the tent sides I use!
- Tent Weights - Most events will require you to have tent weights to keep your tent from causing damage or injuring someone on a windy day. I have applied to markets that required proof of tent weights before they would accept me. I use a combination of table weights and sandbags to ensure my tent is stable in a gust of wind. Your pop-up tent will also likely come with tethers that are great if you are on grass.
- Tables - I personally hate the tables that fold in the center with the pop out legs. My fingers always get caught in those! I decided to buy Ikea tables with detachable legs instead. This helps my tables lay flat in my car and take up less space. They are also smooth on top for a cleaner look.
- Tablecloths - I always recommend white tablecloths for the most neutral backdrop for your products. Busy patterns and dark colors can sometimes take away from what you are trying to sell. If you can afford it, fitted tablecloths are the sleekest, and sometimes you can even have your logo printed on the front for another touch of branding. Here is a great branded tablecloth option!
- Wooden Crates - You can find wooden craft crates at stores like Michaels and Joanne's. These are the perfect easy solution to add height for displaying your product. Real estate on your table is precious, so wooden crates are perfect to double or triple that real estate! **Pro Tip: When you're ready to pack up, the display crates make the perfect totes to store your products for transport.
- Lightweight Chair - Standing at a market all day can be exhausting. I always make sure I have a foldable chair with me when things slow down, and I need a break. This one from amazon is super lightweight and easy to pack in the car.
- Storage Bins - To transport all of my products to and from my sales, clear plastic storage bins are the best option. I can clearly see what is inside each bin, and it also helps keep extra stock clean under my table for when I need to restock.
- Cash Box - Today, with credit cards, Apple Pay and Venmo, it may seem pointless to have change, but you would be surprised how many people still pay with cash at a craft fair. Don't shut these buyers out by only accepting electronic payments. A Cash box is small enough to fit behind or under your table to always have change on hand. **Pro Tip: For an 8 hour craft fair, keep $300 worth of change in singles and 5-dollar bills.
- Point of Sale Terminal - Now that we've covered cash, don't forget about your electronic payments! On the one hand, it's important to cater to cash buyers, but it's also quite common that people won't carry cash and expect to be able to use their card. There are tons of point-of-sale terminals you can choose from. Square has a great tap to pay portable terminal as does Shopify. Their apps are user friendly and work well with and without Wi-Fi. You can also accept apple pay with these tap to pay terminals. Venmo is another option if you have a Venmo business account. Create a sign to display for people to scan your Venmo QR code to pay.
Supplies Checklist
There are some things you would not want to be caught without when you do a craft fair. I have forgotten all of these things at least once, so I have created a checklist for you to make it super easy to remember!
- Scissors - You never know what you might need to cut while you're setting up!
- Packing Tape - This comes in handy when you need to adhere your pricing signs!
- A Pen - You may not think you will need one, but I promise you will.
- Kitchen Twine - Kitchen twine comes in handy if you need to hang your sign from the tent, or just tie anything up for display!
- Water - It can get super hot at an outdoor craft fair, especially in the summer! Be sure to bring lots of water to stay hydrated throughout the day.
- Lunch - Lots of markets are on busy main streets with lots of food options, but you never know when you're going to be swamped with customers (which is the goal after all!) so, I always make sure to pack a lunch that is easy to eat between sales.
- Chargers - If you are using a point-of-sale device, you will also be using your phone, so make sure to remember a phone charging cable, charging cables for the point-of-sale devices, as well as a portable battery charger to plug it all into. You will rarely have access to an outlet at an outdoor sale, so these portable chargers are a lifesaver!
- Battery Powered Fairy Lights - In the winter months for holiday markets, I love having battery powered fairy lights to brighten up my table and make it look as festive as possible! It draws people into your tent when it is illuminated from within!
- Layers - I always dress in layers and never go to a market without a sweatshirt. Even in the summer you never know what the location's weather could be like, so always be prepared! My sweatshirt has my logo on it, so I am always branded!
I hope this beginner's guide was helpful in getting you started on your craft fair journey! Just remember, even if it sometimes feels like a waste of time, or the market isn't the best for sales, getting your brand out there in front of people's eyes is valuable time spent. You really never know what client might arise from showing up in person for your business!
Until next time,
Emily